World of Warships: Legends ship guide

Chikuma

Also called: 筑摩 Beta
Tutorial-tier shipLearn the fundamentals: movement, aim, shell travel, and reading the minimap.
Playstyle
  • Stay near your team; do not push ahead alone
  • Avoid: Sailing in a straight line
Key characteristics
Heavy HE shellsHigh fire chanceFast for the classSlow reload
On this page
Community Data

Chikuma Community Stats

Log in to GamingDiver and upload your data to see Community Data for Chikuma: community win rate, damage, survival, spotting, and your own comparison.

Log in & upload to see Community Data

Playstyle

Overview

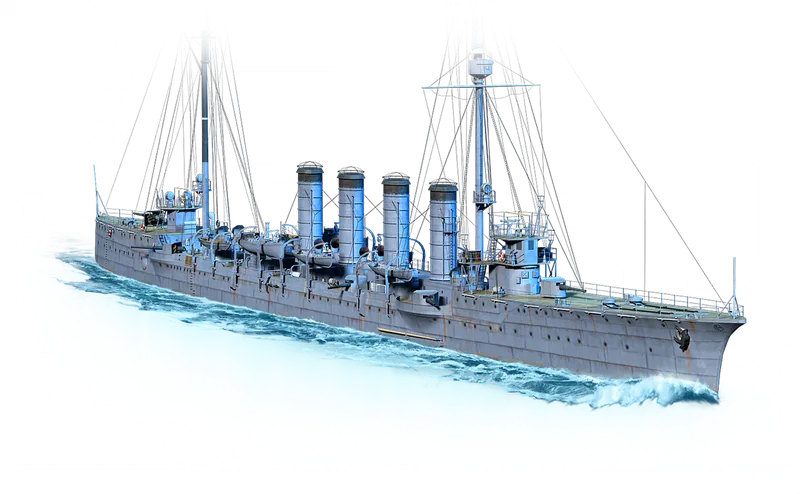
Chikuma is a Tier I Japanese cruiser - a tutorial-tier ship. The kit is for learning basic mechanics: movement, aiming, shell travel time, gun rotation, and reading the minimap. Match impact comes from making fewer mistakes than the other Tier I players, not from gear advantages. Notable: best HE alpha in T1 CAs (2,500) and best HE fire chance in T1 CAs (9).

Positioning

Stay near your team; do not push ahead alone. At Tier I the goal is practicing the basics, so pick a teammate to follow and learn how to lead your shots while their ship is in your field of vision.

Potato Avoidance

Sailing in a straight line

Even Tier I players will lead a predictable target; learn to make small course changes between salvos to break enemy aim. This is the single highest-impact habit to build at this tier.

Signature Traits

ELITE MAIN BATTERY
  • Heavy HE shells · 2500.0 damage
  • High fire chance · 9.0%
  • Big-caliber overmatch · 10.6 mm
  • Overmatch specialist
ELITE MOBILITY
  • Fast for the class · 26.0 kt
  • Heavy powerplant · 22500.0 hp
Slow reload

12.0 s reload, worst of T1 CAs. Salvos punish more, but cycle is slower than peers.

Acquisition

How to get Chikuma

Chikuma is available in the Chikuma branch of the Japan Tech Tree as an early line ship.

Show Japan tech-tree branch diagram
Japan Tech Tree

Chikuma sits in the Chikuma branch. The highlighted path shows the local branch context inside the full Japan tree.

Builds Beta

Pair with a commander whose unique skill complements her main armament; check the build tool for current recommendations.

Open in Build Tool →

Have a build you swear by? Open it in the Build Tool and hit Save build to share it here.

Cohort position

Hide

Where Chikuma sits among Tier I CAs (12 ships). Notable standouts are shown first; the rest of the cohort-ranked stats are in the expand below. Acquisition variants (Black Friday, Founders Edition) are counted once with their base ship, not as separate peers.

BestHE shell damage2,500 (1/11) BestHE fire chance9% (1/11) Top 10%Engine power22,500 hp (2/12) Top 25%Max speed26 kt (3/12) Top 25%Rudder shift3.8 s (3/12) Top 25%Traverse-to-turn ratio6.22 × (4/12) Top 25%Main battery caliber152 mm (3/12) Top 25%Turn-speed retention42.5 hp/m (3/12) Top 25%Power-to-weight4.46 hp/t (3/12) Top 25%Max armor102 mm (4/12) Bottom 25%Acceleration25.3 s (10/12) Bottom 25%Displacement5,040 t (10/12) WorstMain battery reload12 s (12/12) WorstAA threat9 (1 of 3 tied)
See 10 mid-pack stats

Not standouts for Chikuma -- here's where she sits on every other ranked stat in the cohort.

Hit points13,100 HP(7/12) Concealment8.19 km(5/12) Air detection4.91 km(6/12) Main battery range10.02 km(7/12) Fires per minute2.25(9/11) HE DPM62,500(8/11) Main dispersion83.3 m(6/12) HE velocity825 m/s(5/11) Citadel belt40 mm(5/12) Deck armor20 mm(6/12)
Survivability
Hit Points13,100
Displacement5,040 t
Armor range6–102 mm
Plate armor thicknesses6, 10, 11, 13, 19, 20, 22, 25, 40, 51, 89, 102 mm
Armor material/layer entries39
Fire resistance0%
Fire duration30 s
Torp Reduction0%
Main Battery
ModuleArtillery: 152 mm/45 Type41
Mounts / barrels8 mounts / 8 barrels
Reload time12 s
Firing range (base)9.1 km
Firing range (top fire control)10 km
Turret traverse9 °/s
Shell Grouping (σ)2
Max Horiz Disp
ƒHorizontal dispersion ellipse width at max range, from the verified WoWS dispersion model: σH=(R30·idealRadiusminRadiusidealDistance+minRadius)·30 =(910730·80.51000+0.5)·30=83.3m
83.3 m
Max Vert Disp
ƒVertical dispersion ellipse height at max range: σV=σH·radiusOnMax =83.3·0.6=50m
50 m
Med Horiz Disp
ƒ50%-hit horizontal radius: σH,50=σH·GetHalfHitsRatio(σ) =83.3·0.319(σ=2)=26.6m
26.6 m
Med Vert Disp
ƒ50%-hit vertical radius: σV,50=σV·GetHalfHitsRatio(σ) =50·0.32(σ=2)=16m
16 m
Turret turn time
ƒ180 degrees / 9 deg/s traverse speed = 20 s.
20 s
Base shells/min
ƒ5 broadside guns x 60 / 12 s base reload = 25.
25
HE shells
HE Damage2,500
HE Velocity825 m/s
Fire Chance9%
HE penetration
ƒ25 mm ≈ 152 mm caliber / 6 (standard HE penetration ratio).
25 mm
HE full-salvo alpha
ƒ2,500 HE damage x 5 broadside guns = 12,500.
12,500
Base HE DPM
ƒ12,500 HE full-salvo alpha x 60 / 12 s base reload = 62,500.
62,500
Base fires/min
ƒ25 shells/min x 9% fire chance = 2.25.
2.25
AP shells
Min Ricochet91 deg
Guaranteed Ricochet60 deg
AP overmatch
ƒfloor(152 mm caliber / 14.3) = 10 mm (AP auto-penetrates plating this thick or less).
10 mm
AA Defense
AA mount points2
Close-range AA DPS
ƒSum across every AA aura on this ship of (aura.continuous_damage x 3.5 x aura.hit_probability). Here: (3×3.5×0.85) = 9. Covers AA-only mounts plus dual-purpose secondaries (Bismarck 105mm, USN 5"/38 cruiser secondaries) and dual-purpose main batteries (Sumner-class 5"/38, Akizuki-line 100mm). Formula validated against in-game captures on California, Sumner, Manfred von Richthofen, Dante Alighieri (exact) and within +/-17% on the remaining verified ships.
9
Maximum AA range
ƒLongest-reaching aura across AA-only + dual-purpose auras.
1 km
6.5 mm 3rd Year Type2×1 7mm
Near aura
DPS3
Range1 km
Maneuverability
Engine moduleEngine: 22,500 hp
Engine power22,500 hp
Maximum speed26 kt
Turning circle radius530 m
Rudder shift time3.8 s
Engine power-boost threshold7 kt
Engine spool-up time15.3 s
Reverse spool-up time7.7 s
Acceleration 0-90%
ƒTime to reach 90% of top speed (23.4 kt of 26 kt), from our in-house acceleration model.
25.3 s
Acceleration 0-99%
ƒTime to reach 99% of top speed (25.7 kt of 26 kt). 99% rather than 100% because true top speed is asymptotic (thrust meets drag), so the last fraction of a knot is never quite gained.
41.5 s
Traverse-to-turn ratio
ƒHow many degrees the turret can swing for each degree the hull turns. Turn rate ωhull=180π·Vmax(m/s)Rturn=180π·26.0·0.5144530=1.45°/s, so ratio=ωturretωhull=91.45=6.2×. Below 5 the turrets drag in a turning fight; 25+ keeps up with any rudder.
6.2× slow
Concealment
Detectability by sea8.19 km
Detectability by air4.91 km
Smoke firing penalty3.54 km
Detect after firing main guns
ƒmax(base sea detectability, gun-firing bloom range). Firing never pulls your detection closer than base concealment.
8.19 km
Detect Fire Sea10.19 km
Detect Fire Air7.91 km
Guaranteed Detect2 km
Consumables
Damage Control Party∞ charges · 60 s reload · 5 s active
Module options (1)

Stats above use the fully-upgraded modules. These are the research-tree alternatives; trade-offs are flagged.

Fire controlUpgrade
  • Main battery range9,107 → 10017.7 m

See all derived stats

Show

All values are ship base stats with modifications and upgrade changes denoted inline.

Numbers the spec table cannot show directly: alpha-strike math, DPM, dispersion, AP penetration. Click the formula chip on any row to reveal how it is calculated.

Main battery formulas

Shell Grouping (σ)2
Max Horiz Disp83.3 m
Horizontal dispersion ellipse width at max range, from the verified WoWS dispersion model: $\sigma_H = \left(\dfrac{R}{30}\cdot\dfrac{\text{idealRadius}-\text{minRadius}}{\text{idealDistance}} + \text{minRadius}\right)\cdot 30$ $= \left(\dfrac{9107}{30}\cdot\dfrac{8-0.5}{1000} + 0.5\right)\cdot 30 = 83.3\,\text{m}$
Max Vert Disp50 m
Vertical dispersion ellipse height at max range: $\sigma_V = \sigma_H \cdot \text{radiusOnMax}$ $= 83.3 \cdot 0.6 = 50\,\text{m}$
Med Horiz Disp26.6 m
50%-hit horizontal radius: $\sigma_{H,50} = \sigma_H \cdot \text{GetHalfHitsRatio}(\sigma)$ $= 83.3 \cdot 0.319\;(\sigma = 2) = 26.6\,\text{m}$
Med Vert Disp16 m
50%-hit vertical radius: $\sigma_{V,50} = \sigma_V \cdot \text{GetHalfHitsRatio}(\sigma)$ $= 50 \cdot 0.32\;(\sigma = 2) = 16\,\text{m}$
Dispersion familyCruiser Disp.
Standard cruiser dispersion baseline.
HE penetration25 mm
25 mm ≈ 152 mm caliber / 6 (standard HE penetration ratio).
AP overmatch10 mm
floor(152 mm caliber / 14.3) = 10 mm (AP auto-penetrates plating this thick or less).
Broadside guns used for alpha5
Barrels that can bear on one beam (5 of 8); casemate/wing mounts only fire one side.
Turret turn time20 s
180 degrees / 9 deg/s traverse speed = 20 s.
HE full-salvo alpha12,500
2,500 HE damage x 5 broadside guns = 12,500.
Base HE DPM62,500
12,500 HE full-salvo alpha x 60 / 12 s base reload = 62,500.
Base shells/min25
5 broadside guns x 60 / 12 s base reload = 25.
Base fires/min2.25
25 shells/min x 9% fire chance = 2.25.

AA defense

Close-range AA DPS9
Sum across every AA aura on this ship of (aura.continuous_damage x 3.5 x aura.hit_probability). Here: (3×3.5×0.85) = 9. Covers AA-only mounts plus dual-purpose secondaries (Bismarck 105mm, USN 5"/38 cruiser secondaries) and dual-purpose main batteries (Sumner-class 5"/38, Akizuki-line 100mm). Formula validated against in-game captures on California, Sumner, Manfred von Richthofen, Dante Alighieri (exact) and within +/-17% on the remaining verified ships.
Maximum AA range1 km
Longest-reaching aura across AA-only + dual-purpose auras.
AA threat index9
SUM over AA auras of (aura DPS x aura range km). A plane crossing the AA bubble is exposed to each aura for a time proportional to that aura's range, so long-reach DPS is worth more than the same DPS in a short bubble. Units: DPS*km; used to rank overall AA threat across the cohort.
Near aura range1 km

Armor Beta

Hull HP 13,100, distributed across 5 hull zones, each with its own plate thicknesses, saturation cap, and pen thresholds. HP caps are the exact in-game values, not estimated.

Bow & stern6 mm

Overmatched by 59+ guns across the bracket. Can’t reliably bow-tank; gets bow-citadelled and overpenned.

Belt / citadel40 mm

Thin belt: battleship AP citadels straight through it broadside. Rely on angle, speed and concealment, never sit flat.

Farming6 mm

Superstructure and extremities take HE pens and AP overpens from nearly any gun: steady chip damage. Fire resistance 0%, fires burn 30s. Range-by-range in the ballistics tool →

Section Plates HP cap Threats Tactic
Bow6 mm primary (range 6–102 mm)1,300 (10% of HP)
Overmatched by 127mm+ (Farragut)6 mm: HE pens from 127mm+
Bow-tank fits behind this exterior plate. Saturation is FAST here; the cap is often only a few thousand HP.
Hull (midship)6 mm primary (range 6–13 mm)10,800 (82% of HP)
Overmatched by 127mm+ (Farragut)6 mm: HE pens from 127mm+
Largest HP pool. Citadel sits behind these plates; thinner deck and side plating absorb the rest.
Stern6 mm primary (range 6–89 mm)800 (6% of HP)
Overmatched by 127mm+ (Farragut)6 mm: HE pens from 127mm+
Mirror of bow. Same fast saturation.
Citadel40 mm primary (range 6–40 mm)≈ 165,500 (effectively no cap)
Citadel pen: full damageOver-pen: ×0.10 damage
Effectively no cap; citadel pool sits at ~165k HP on every ship. An AP citadel penetration deals the shell's full damage, the biggest single hit available; only over-penetrations are damped, to ×0.10.
Superstructure6 mm primary (range 6–20 mm)200 (2% of HP)
Any HE ≥16 mm pens at full damage
Any HE ≥16 mm pens at full damage. HE-spam target, and the section saturates fast (often only a few thousand HP).
Turret (module, per magazine)separate HP pool, does not drain ship HP6,600 magazine HPMagazine detonation1–30% chance · below ~75% HPPer-turret powder-magazine HP. Detonation chance scales from 1% (no mag damage) to 30% (full mag damage); this range is the in-game value. Detonation can't roll while the ship is above ~75% HP (the standard detonation-protection threshold, not a per-ship stat). Smaller magazines saturate to the 30% ceiling faster.
AA mount (7 mm mount)separate HP pool, does not drain ship HP200 per-mount HPDestroyed at 0 HPPer-mount HP for the heaviest AA on this ship. An AA mount destroyed at 0 HP stops shooting down planes for the rest of the battle; DCP does not repair destroyed mounts. HE shells specifically target AA mounts since the small-caliber HP pool falls fast.
Rudder (module)separate HP pool, does not drain ship HP5,600 module HPIncapacitated at 0 HPWhen module HP reaches 0 the rudder locks at its current angle until DCP repairs it. Repair via Damage Control Party.

Saturation cap = HP a section can absorb before further damage to it is reduced (the "bow-tank" effect). Citadel pool is ~165k on every ship (effectively no cap); damage is gated by pen/over-pen multipliers instead. Superstructure saturates fast but HE always pens regardless of the plate thickness. Rudder (and other module HPs) are a separate pool from ship HP: damaging a module doesn't drain ship HP. Incapacitated modules like the rudder and engine are restored by DCP, but secondary and AA mounts destroyed at 0 HP stay out for the rest of the battle.

Approximated side profile.
Open the 3D armor viewer →
3D armor viewer
Open in Charting Tool

Acceleration and Ballistics Chart

Exteriors

Skins & permanent camouflages

Every custom exterior Chikuma can equip, from in-game data.

  • Chikuma default exterior
    DefaultThe ship’s standard exterior

Primary official WG sources

GamingDiver has indexed official WG mentions for this ship, but none are focused enough to show as a primary source card here. Low-context list, crate, comparison, or passing mentions are intentionally filtered out.

Source status No high-context source card yet Filtered for precision